Dear DBA's,
After performing few tasks on oracle autonomous database what i have observed is "Oracle made DBA tasks lot easier but finding jobs gonna be very tough"
No more black screen in DBA's life if autonomous rolled out in all companies. All you will get is connection to database through sql developer. You can start/stop services and backup the database through console though its automatically backup.
All the below have been covered under this post with detailed screenshots.
Provisioning Autonomous Data Warehouse Cloud
Connecting SQL Developer and Creating Tables
Loading Your Data
Oracle have really made lot easier in terms of data handling and daily routine activities in oracle autonomous database. Lets surf through the screen shots below to have more knowledge.
Below is the Dashboard as soon as you log into your account :
Lets see how to create Autonomous Data Warehouse in detail with step by step. Just click on Create Autonomous Data Warehouse.
Below is the already running instance and you can figure what are all the options will be present for an existing instance to get a better idea.

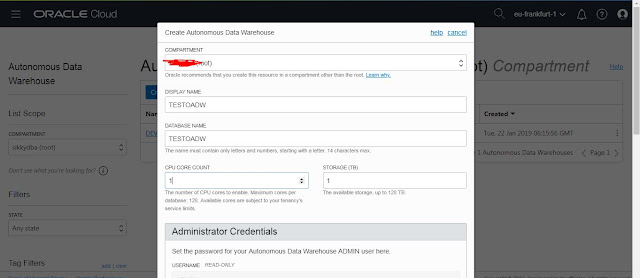
Lets create an instance. Just provide the inputs to create an autonomous data warehouse.
In the Autonomous Data warehouse you will be getting admin user which is probably equivalent to sysdba. There wont be any credentials provided to access the server. All you have is the admin user to perform any operations in database through sqldeveloper.
Thats it. You can see the below screenshot to see the DB provisioning is in-progress. It will not take more than 10 minutes hardly.
Once the db is provisioned you will be notified through email like below.
Thats it Autonomous Data warehouse is created.
Lets see how to load the data into your newly provisioned database.
Pre-requisites :
- All the tables must be created under the required schema inside the newly provisioned autonomous db.
- All your data from the existing db must be converted into dat files.
- Dat files can be stored in oracle object store or Amazon S3 (I am aware only these two as of now)
Lets see how to load dat files into object store.
From the menu (three lines in the left corner in the below image ) navigate into "object storage".
Name your bucket.
Upload the dat files into your bucket.
You can see the below image as dat files uploaded into object store.
Lets see how to connect newly provisioned database. Click into the database and download the credentials to connect to database like shown below.
Supply password for wallet and download the zip file.
Once you have zip file you can connect to the database through sqldeveloper.
Please refer the below image for the inputs.
connection Name : user defined
Username : admin
password : Use the one which was supplied while the db creation.
connection Type : cloud wallet ( you wont see this option in older version) Make sure you have latest sqldeveloper to connect to autonomous db.I have used 18.3.
configuration file : Select the downloaded zip file from the console.
Service ; Services will be displayed once you selected zip file.
Once you connected to the db you can create an user to load the data into db.
create user adwc_user identified by "<password>";
grant dwrole to adwc_user; --> Make sure to provide the role which all has all needed privilages.
There is an open issue due to bug "Bug 28746021 - IDCS 401 UNAUTHORIZED " which dont let you to load the data from your IDCS account.
We need to create an user under OCI to load the data.
Click the user management.
Create user
Make sure you have changed the visibility into public in your bucket where all the dat files reside.
Next we need auth token to create credential inside our database in order to load the data. Get into your bucket and select the newly created user.
Click Auth tokens and generate it.
Click Auth tokens and generate it.
Once the token is generated copy it somewhere in notepad file since we need it for the next step.
Run the below into your database from adwc_user.
  begin
  DBMS_CLOUD.create_credential (
    credential_name => 'OBJ_STORE_CRED',   # --> User defined
    username => 'load_testoadw',  # --> New user created in OCI. refer images above.
    password => 'G3ga);tiPyHKUXMrwp42' --> Auth token
  ) ;
end;
/
Make sure the procedure is completed successfully. Use the below query to check newly created credentials.
select * from dba_credentials;
Now lets see how to load the data from dat files. Please find the below image that shows the empty table that
created in autonomous db.
begin
dbms_cloud.copy_data(
table_name =>'CHANNELS',
credential_name =>'OBJ_STORE_CRED',
file_uri_list =>'https://swiftobjectstorage.eu-frankfurt-1.oraclecloud.com/v1/<Tenancy_name>/load_data_testoadw/chan_v3.dat',
format => json_object('ignoremissingcolumns' value 'true', 'removequotes' value 'true')
);
end;
/
Below is the important to be taken care of :
https://swiftobjectstorage.eu-frankfurt-1.oraclecloud.com/v1/<Tenancy_name>/load_data_testoadw/chan_v3.dat',
ITs nothing but :
https://swiftobjectstorage.<
region
name>.oraclecloud.com/v1/<tenant name>/<bucket name>/<file name>
eu-frankfurt-1 --> Its my region name. make sure you updated yours.
Update the bucket name and file name too.
Look at the pic below after data loaded into autonomous db.
If you hit any error like the below :
ORA-29913: error in executing ODCIEXTTABLEOPEN callout
ORA-06512: at "C##CLOUD$SERVICE.DBMS_CLOUD", line 860
ORA-20401: Request failed with status 401 - https://swiftobjectstorage.eu-frankfurt-1.oraclecloud.com/v
ORA-06512: at "C##CLOUD$SERVICE.DBMS_CLOUD_INTERNAL", line 2910
ORA-06512: at "C##CLOUD$SERVICE.DBMS_CLOUD_REQUEST", line 939
ORA-06512: at "C##CLOUD$SERVICE.DBMS_CLOUD_REQUEST", line 667
ORA-06512: at "C##CLOUD$SERVICE.DBMS_CLOUD_REQUEST", line 904
ORA-06512: at "C##CLOUD$SERVICE.DBMS_CLOUD_INTERNAL", line 2883
ORA-06512: at line 1
ORA-06512: at "C##CLOUD$SERVICE.DBMS_CLOUD", line 835
ORA-06512: at "C##CLOUD$SERVICE.DBMS_CLOUD", line 895
ORA-06512: at line 2
29913. 00000 - "error in executing %s callout"
*Cause: The execution of the specified callout caused an error.
*Action: Examine the error messages take appropriate action.
Its purely due to authentication. Follow note id
2492544.1 if needed.
Thanks for reading my post patiently.


